March 13, 2025
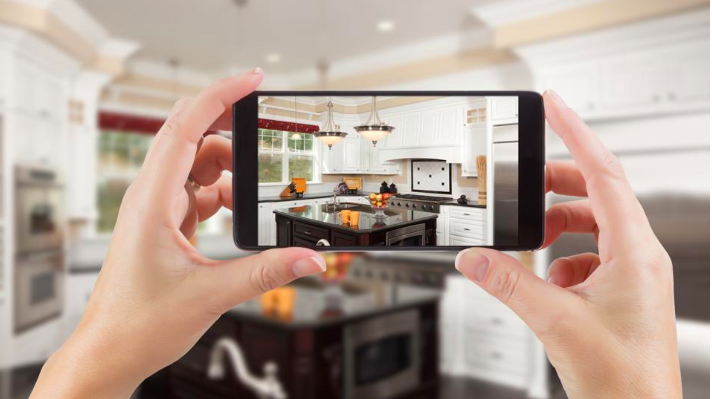
Tips for Conducting Virtual Property Tours
Virtual property tours have become an essential tool for property managers and landlords, especially in a world where remote interactions are increasingly common. They allow potential tenants to explore a property from the comfort of their own home, saving time for both parties. However, conducting an effective virtual tour requires preparation and skill. Here’s a guide on tips for conducting virtual property tours that will impress potential tenants and help you close deals faster.
1. Choose the Right Technology
Why It’s Important: The quality of your virtual tour depends on the tools you use.
Options for Virtual Tours:
Video Conferencing Tools: Zoom, Skype, or Google Meet for live tours.
360-Degree Cameras: For interactive, self-guided tours.
Smartphone Apps: Use apps like Matterport or Zillow 3D Home for professional-quality tours.
Tips:
Test your equipment and internet connection beforehand.
Use a tripod or stabilizer to avoid shaky footage.
2. Prepare the Property
Why It’s Important: A clean, well-staged property makes a great first impression.
Steps to Prepare:
Clean and declutter every room.
Stage the property with furniture and decor to help tenants visualize the space.
Ensure proper lighting by opening curtains and turning on lights.
Fix any minor repairs or issues (e.g., leaky faucets, chipped paint).
3. Plan the Tour Route
Why It’s Important: A structured tour ensures you cover all key areas and highlights.
How to Plan:
Start with the exterior (curb appeal, parking, entrance).
Move through common areas (living room, kitchen, dining area).
Show bedrooms and bathrooms, highlighting storage and unique features.
End with amenities (balcony, backyard, gym, pool).
Tip: Create a checklist to ensure you don’t miss anything.
4. Highlight Key Features
Why It’s Important: Emphasizing the property’s best features helps tenants see its value.
What to Highlight:
Upgrades (e.g., new appliances, hardwood floors).
Storage space (closets, cabinets, garage).
Unique features (fireplace, balcony, smart home technology).
Amenities (pool, gym, laundry facilities).
5. Engage with Your Audience
Why It’s Important: Interaction makes the tour more personal and engaging.
How to Engage:
Introduce yourself and ask the tenant about their needs.
Point out features that might appeal to them (e.g., “This spacious kitchen is perfect for cooking enthusiasts”).
Encourage questions and provide detailed answers.
Share tips about the neighborhood (e.g., “There’s a great coffee shop just around the corner”).
6. Use High-Quality Visuals
Why It’s Important: Clear, professional visuals make the property more appealing.
Tips for Great Visuals:
Use a high-resolution camera or smartphone with a good camera.
Avoid shaky footage by using a tripod or stabilizer.
Capture wide-angle shots to show the full room.
Use natural light whenever possible.
7. Offer a Live or Pre-Recorded Option
Why It’s Important: Some tenants prefer live interaction, while others want the flexibility of a pre-recorded tour.
How to Offer Both:
Live Tours: Schedule a time for a real-time video call with the tenant.
Pre-Recorded Tours: Create a video walkthrough and share it via email or your listing.
Tip: Use pre-recorded tours as a follow-up for tenants who can’t attend live tours.
8. Provide a Neighborhood Overview
Why It’s Important: Tenants want to know about the area as much as the property itself.
What to Include:
Nearby schools, parks, and shopping centers.
Public transportation options and commute times.
Local attractions, restaurants, and entertainment venues.
Tip: Share a map or photos of the neighborhood during the tour.
9. Follow Up After the Tour
Why It’s Important: Following up shows you’re professional and keeps the property top of mind.
How to Follow Up:
Send a thank-you email with a link to the property listing.
Include additional photos, videos, or a virtual tour.
Ask if they have any further questions or need assistance.
Provide details on the application process and next steps.
10. Use Virtual Tour Software for Self-Guided Tours
Why It’s Important: Self-guided tours give tenants the flexibility to explore the property at their own pace.
Tools to Use:
Matterport: Creates interactive 3D tours.
Zillow 3D Home: Allows you to upload 3D tours to your listing.
Google Street View: For simple, accessible tours.
Tips:
Add captions or voiceovers to highlight key features.
Include a call-to-action (e.g., “Contact us to schedule a live tour”).
11. Be Transparent About the Property
Why It’s Important: Honesty builds trust and prevents misunderstandings.
How to Be Transparent:
Point out any flaws or issues with the property (e.g., “This room gets less natural light”).
Provide accurate measurements and details.
Share information about noise levels, parking, or other potential concerns.
12. Practice and Improve
Why It’s Important: The more you conduct virtual tours, the better you’ll become.
Tips for Improvement:
Record yourself during practice tours to identify areas for improvement.
Ask for feedback from tenants or colleagues.
Stay updated on new tools and techniques for virtual tours.
Final Thoughts
Virtual property tours are a powerful way to showcase your rental property and attract potential tenants. By using the right technology, preparing the property, and engaging with your audience, you can create a memorable and effective tour that stands out in a competitive market.
Remember, the goal is to help tenants visualize themselves living in the space and address any concerns they may have. With these tips, you’ll be well-equipped to conduct virtual tours that impress and convert.